Exactly how to do fashion jewelry photography like a pro ?
Quick Answer
To do fashion jewelry photography like a pro, use a sturdy tripod and a macro lens to capture intricate details. Soft, diffused natural lighting or a lightbox is essential to prevent harsh glare on metals and stones. Finally, style your pieces—like a delicate personalised necklace—on a clean, contrasting background to make them truly stand out.
What is personalised necklace in relation to Exactly how to do fashion jewelry photography like a pro ?
Key Takeaway: A personalised necklace is a custom-made piece of jewelry that requires highly specialized, macro-style photography techniques to accurately capture its intricate engravings, unique textures, and the delicate way it catches and reflects the light.
Shooting fashion jewelry is an art form that requires patience, precision, and a deep understanding of light. When you add a custom element into the mix, specifically a personalised necklace, the stakes are even higher. Whether you are an ecommerce store owner, an artisan, or a content creator looking to sell or showcase custom name necklaces, rings, and bracelets, knowing exactly how to do fashion jewelry photography like a pro is an invaluable skill. In this comprehensive guide, we will explore every facet of the process, from the fundamental physics of light on metal to the advanced styling techniques used by top editorial photographers.
### Understanding the Challenge of Photographing a Personalised Necklace
Why is a custom piece so difficult to photograph? Unlike mass-produced jewelry where a slight shadow or glare might go unnoticed, a personalised necklace relies entirely on its custom details—usually text, names, coordinates, or specific dates. If your lighting is too harsh, the engraving becomes washed out. If your camera lacks resolution, the delicate font looks blurry. To shoot like a professional, you must bridge the gap between product photography and macro photography.
### 1. Essential Equipment for Professional Results
You don’t need to spend tens of thousands of dollars to achieve professional results, but you do need the right tools for the job.
#### The Camera Body
While modern smartphones (like the latest iPhones or Samsung Galaxy devices) have impressive computational photography capabilities, they often over-process fine details. For true professional fashion jewelry photography, a mirrorless camera or a DSLR with a high megapixel count (24MP or higher) is recommended. This allows you to crop in closely to the engraving on a personalised necklace without losing image quality. Full-frame sensors are ideal because they handle noise exceptionally well at base ISOs, providing the cleanest possible image.
#### Lenses: The Magic of Macro
If there is one non-negotiable piece of equipment, it is the lens. You need a dedicated macro lens. A 90mm, 100mm, or 105mm macro lens is perfect. Why? Because it allows you to focus closely while maintaining a comfortable working distance between the lens and the jewelry. This prevents you from casting your own shadow on the product. A quality macro lens will resolve the microscopic edges of the metal and the tiny curves of the letters on a custom name necklace.
#### The Indestructible Tripod
When shooting jewelry, you will often use apertures of f/8, f/11, or even f/16 to get the entire piece in focus. This limits the amount of light hitting the sensor, meaning your shutter speed will be slow. A sturdy, heavy-duty tripod is absolutely essential to eliminate camera shake. Any vibration, no matter how small, will render your image useless for commercial purposes.
#### Lighting Gear
You cannot shoot professional jewelry with a bare, direct flash or standard room lighting. You need:
* **A Light Tent (Lightbox):** This diffuses the light entirely, wrapping it softly around the jewelry.
* **Continuous LED Lights:** Daylight-balanced (5500K) lights allow you to see exactly how the light is falling on your personalised necklace before you press the shutter.
* **Reflectors and Black Flags:** White foam core boards bounce light into shadows, while black foam core boards (flags) block light to create depth and prevent unwanted reflections on shiny gold or silver surfaces.
### 2. Setting Up Your Scene and Styling
Styling is what elevates a basic product shot to high-end fashion jewelry photography.
#### The Background
For e-commerce and selling platforms (like Shopify, Amazon, or Etsy), a pure white background (RGB 255, 255, 255) is usually standard. However, if you are shooting “fashion” editorial style for social media or a brand’s homepage, you want textures.
* **Marble or Tile:** Provides a luxurious, cool-toned foundation.
* **Raw Linen or Velvet:** Adds a tactile softness that contrasts beautifully with hard metal and gemstones.
* ** acrylic risers:** These give your jewelry a floating, modern look.
#### Positioning the Personalised Necklace
A necklace laying completely flat often looks lifeless. Professionals use various techniques to give it shape and dimension:
* **Jewelry Wax and Pins:** Use invisible museum wax or T-pins (pushed through a foam board covered in velvet) to hold the necklace in a perfect, natural drape.
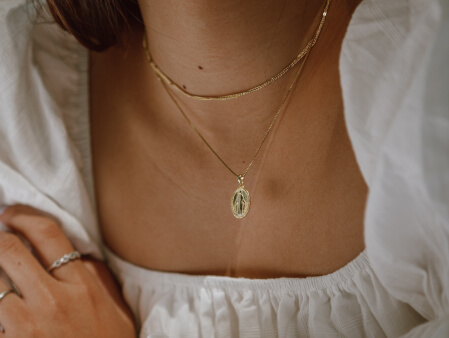
* **Busts and Necklines:** Placing a personalised necklace on a clear acrylic bust, a marble mannequin, or styling it on a model instantly shows the customer how the piece will actually look when worn.
* **The “Drop” Technique:** Hang the necklace from a fishing line (monofilament) stretched between two stands. This creates a natural, gravity-defying curve and is a favorite technique in high-end fashion jewelry campaigns. You can easily clone out the fishing line in post-processing.
### 3. Mastering Lighting for Metal and Engravings
Light is the paintbrush of the photographer. Never light the jewelry directly; light the surroundings.
#### Soft Lighting for Polished Metals
Polished silver, gold, and platinum act like mirrors. If you point a direct light at them, they will create specular highlights (blown-out white spots) that hide the details of the piece. By shooting inside a lightbox or bouncing your continuous lights off large white walls or umbrellas, you create a large, soft light source. This produces smooth, creamy gradients on the metal, highlighting the sleek finish of the personalised necklace.
#### Raking Light for Deep Engravings
How do you make the letters on a custom name necklace pop? You use a technique called “raking light.” This involves positioning your light source at a severe 90-degree angle to the jewelry, almost parallel to the table surface. The light skims across the surface of the metal. The high points (the flat metal) catch the light, while the low points (the engraved names or dates) fall into deep shadow. This creates high contrast and makes the custom text instantly readable to the viewer.
#### Managing Reflections
The cardinal rule of jewelry photography is: *Your camera will always reflect in the jewelry.* To fix this, cut a small hole in a large piece of white foam core, push your camera lens through the hole, and shoot through it. This ensures that the only thing reflecting in the polished metal of the necklace is a clean, white surface.
### 4. Camera Settings for Sharpness and Clarity
Put your camera in full Manual Mode (M) and follow these baseline settings:
* **Aperture (f-stop):** Set your camera to f/11 or f/16. You need a deep depth of field to ensure the clasp, the chain, and the focal point (the personalised pendant) are all razor-sharp.
* **ISO:** Set it to 100 or the lowest native ISO your camera has. This ensures zero digital noise or grain, which is highly visible on smooth metal surfaces.
* **Shutter Speed:** Let the lighting dictate this. Because you are on a tripod, it doesn’t matter if your shutter speed is 1/15th of a second or 2 full seconds. Use a 2-second timer delay or a remote shutter release so you don’t shake the camera when pressing the button.
* **White Balance:** Do not use Auto White Balance (AWB). Set it manually to the exact Kelvin temperature of your lights (usually 5500K) or use a gray card to set a custom white balance. This ensures the gold looks accurately gold, and the silver looks silver, not overly yellow or blue.
* **Focus:** Switch to manual focus. Use your camera’s “Live View” and zoom in digitally 10x on the engraved lettering of the personalised necklace. Turn the focus ring until the tiny curves are perfectly crisp.
### 5. Working with Models: Bringing the Jewelry to Life
Fashion jewelry isn’t just about the product; it’s about the lifestyle and the emotion it evokes. A personalised necklace is a sentimental item. Showing it on a model helps the buyer visualize the scale and fit.
#### Model Call and Styling
When hiring a model or using a friend, keep their styling minimal. You want the jewelry to be the hero. Use V-neck tops, off-the-shoulder tops, or elegant solid colors that contrast with the color of the metal. Ensure the model’s skin is well-moisturized, as dry skin can distract from the delicate nature of a fine chain.
#### Posing the Model
Direct the model to create elegant, elongated lines. Instead of having them look straight at the camera, have them gaze slightly off-camera for a candid, high-fashion look.
* **The Clavicle Shot:** A close-up focusing on the neck and collarbone is incredibly popular for personalized necklaces. Ensure the clasp is hidden at the back of the neck and the pendant rests perfectly in the hollow of the throat or just below the collarbone.
* **Hands and Interaction:** Having the model lightly touch the pendant with a manicured hand can draw the viewer’s eye straight to the custom engraving.
### 6. Post-Processing and Retouching: The Final Polish
Shooting the image is only 50% of the process. The magic happens in post-production, primarily using Adobe Lightroom and Adobe Photoshop.
#### Lightroom Global Adjustments
Import your RAW files into Lightroom. RAW files contain significantly more data than JPEGs, allowing you to recover details in the highlights and shadows.
* **Exposure:** Adjust so the white background is true white but the jewelry details are preserved.
* **Contrast and Texture:** Add a slight bump in clarity and texture to make the details of the chain and engraving pop.
* **Color Correction:** Fine-tune the Hue, Saturation, and Luminance (HSL) sliders to ensure the metal tones look like expensive, premium materials.
#### Photoshop Magic (Local Retouching)
Take the image into Photoshop for pixel-level perfection.
* **The Spot Healing Brush:** Jewelry attracts dust like a magnet. Use this tool to remove every speck of dust, fingerprint, and micro-scratch from the metal.
* **Dodging and Burning:** Use the Dodge tool to lighten highlights and the Burn tool to deepen shadows. This technique allows you to manually enhance the readability of the personalized engraving.
* **Frequency Separation:** If shooting on a model, use frequency separation to smooth out any skin blemions on the model’s neck or chest, ensuring the skin looks flawless but natural, keeping the absolute focus on the necklace.
* **Creating True White:** Use a layer mask and a soft brush to paint pure white (#FFFFFF) around the edges of the jewelry if you are aiming for a floating, clean e-commerce look.
### 7. Special Techniques for Specific Personalised Necklace Styles
Different custom pieces require different approaches:
#### Name Necklaces
Script fonts are notoriously difficult to photograph. The loops and curls can blend together. Ensure your depth of field is deep enough (f/16) so the entire cursive name is in focus. Use a subtle gradient lighting setup so the metal curves distinguish themselves from one another.
#### Bar Necklaces (Coordinates, Dates)
Horizontal bar necklaces are highly reflective. Shoot these from a slightly angled top-down perspective (45 degrees) to show the thickness of the bar and prevent the flat surface from acting as a perfect mirror reflecting your ceiling.
#### Photo Engraved Necklaces
Some personalized jewelry features a tiny laser-engraved photograph. These are usually matte-finished to hold the ink/photo. Because there is no shiny metal to bounce light off, you can use slightly more dramatic, directional lighting to bring out the contrast of the engraved photo without worrying about specular glare.
### 8. Optimizing for E-commerce and Social Media
Once your images are retouched, you must format them correctly for the digital world.
#### File Formats and Sizing
* **For Websites (Shopify/WooCommerce):** Save your images as high-quality JPEGs. Resize them to 2000px by 2000px. This allows users to zoom in on the details of the personalised necklace without crashing your website’s loading speed. Keep the file size under 250KB.
* **Naming Conventions:** SEO matters. Name your image files descriptively before uploading them. Instead of “IMG_9834.jpg”, name it “gold-personalised-necklace-custom-name-engraving.jpg”.
* **Alt Text:** Always write descriptive alt text. “A stunning 14k gold personalised necklace featuring a custom engraved name pendant on a delicate chain.” This helps visually impaired users and tells Google Image Search exactly what your product is.
#### Platform Specific Guidelines
* **Instagram & Pinterest:** Crop your images to 4:5 (1080×1350 pixels) for vertical portraits that take up maximum screen real estate on mobile devices.
* **Amazon/Etsy:** Ensure your main image is on a pure white background (RGB 255, 255, 255). Use the other gallery slots to show the necklace on a model, macro close-ups of the engraving, and lifestyle shots showing the beautiful packaging.
### 9. The Psychology of Selling Personalised Jewelry Through Imagery
When a customer buys a mass-produced ring, they are buying an accessory. When they buy a personalised necklace, they are buying an emotion—a memory, a connection to a loved one, a piece of their own identity. Your photography must evoke this.
Use warm, inviting tones in your lifestyle shots. Show the unboxing experience—the tissue paper, the velvet box, the ribbon. Photograph the necklace draped over a handwritten love letter or resting on a sunlit windowsill. By combining the technical precision of macro product photography with the emotional resonance of lifestyle fashion photography, you create images that do not just display a product; they tell a story.
By mastering your camera settings, sculpting your light, styling your scene meticulously, and refining the details in post-production, you can transform a beautiful custom jewelry piece into a global fashion sensation. The techniques outlined above will ensure that every facet, every chain link, and every deeply personal engraving is showcased exactly as it was meant to be seen.
Why does personalised necklace matter for readers?
Readers care about personalised necklaces because they represent deep emotional value, individual identity, and meaningful gifts for loved ones. In a visually driven digital marketplace, accurately capturing the intricate custom details of these pieces is crucial. Professional photography ensures that buyers can clearly see the quality, texture, and exact engraving of the personalized item, which instantly builds trust, reduces return rates, and validates the premium price tag associated with custom-made jewelry.
Frequently Asked Questions
What is personalised necklace in relation to Exactly how to do fashion jewelry photography like a pro ?
A personalised necklace is a custom piece of jewelry that requires expert photography techniques to properly highlight its unique details. Shooting it like a pro means using macro lenses and controlled lighting to make the custom text, delicate chains, and metal finishes look sharp, luxurious, and highly appealing to online buyers.

About author